Installing blinds can be a daunting task in the world of home improvement. Visions of toppling chairs and confusing instructions can loom over the process. Fortunately, the reality is far simpler than you may think. In fact, installing bespoke blinds can be as easy as snapping a frame into place or taking a few minutes to screw brackets and snap in a headrail.
Here, we’ll show you how to install blinds. Whether you’re looking for advice on mounting vertical blinds, skylight blinds or something in between, you’ll find a step-by-step guide to getting the job done quickly and without a ton of hassle.
Helpful Hints Before You Start

Before we dive into how to install blinds, it’s important to understand the different options you can choose from. Here, we’ll show you the difference between mounts and fix options so you can choose the best method for your home.
Choosing Inside or Outside the Recess Mounts
Window blinds can be mounted either inside or outside the recess. Inside the recess mounts fit snugly inside the hollow of your window. This type of mount offers a clean and sophisticated aesthetic as there is no overlap on the side of the window. In general, an inside the recess mount is the most popular choice.
Outside the recess mounts are ideal for windows that have a narrow window sill or those with obstructions such as handles and cranks. For this type of mount, you hang the blinds just above the window opening and the sides of the blind extend just past the edge of the window recess.
In most cases, an inside the recess mount will be better when it comes to visual style. You can choose an outside the recess mount if you have narrow window sills or windows that have handles that prevent proper operation by mounting the blinds inside the recess.
Understanding Different Fix Styles
Aside from inside mounts and outside the recess mounts, you can also choose between different fix styles including face fix, top fix and ceiling fix. Here’s a quick breakdown of the different styles including the pros and cons of each one.
Face Fix
A face fix is a mount where the headrail of the blind is secured to the lintel or architrave — the beam that runs along the top of the window frame or directly to the face of the window frame itself. This type of mount provides the highest degree of privacy and blackout light control, especially when using roller blinds and roman blinds. It can be used for both outside the recess mounts and on some inside the recess mounts depending on the frame of the window.
The downside to this mount is that some blinds — especially wooden blinds and other heavier styles — can put added stress on the lintel. This type of mount also obscures the lintel, making it a poor choice if you have decorative frames or headers above your windows.
Top Fix
A top fix can only be used on inside the recess mounts. The blind is secured to the underside of the lintel, providing a seamless, built-in look. It creates a minimal look and is a great choice for modern homes and spaces where you want to create a sophisticated look. The downside of a top fix mount is that not all windows are deep enough to secure the headrail. Make sure to measure your blinds and the window recess before deciding on a mounting and fix style.
Ceiling Fix
In some cases, you may need to fix the blinds to the ceiling rather than the wall. This style is particularly common for floor-to-ceiling windows where you can’t drill into the aluminium frame of the window. This fix creates the illusion of larger windows by drawing the eye upwards and it can also be paired with other blinds and curtains to maximise light control. The downside here is that you may need to add battening — solid strips of wood or metal for support — when using heavy blinds such as real wood venetian blinds.
Get Extra Help
When it comes to how to install blinds, the process is virtually the same for almost all blind styles, though there are exceptions for cordless blinds. Here, we’ll cover the basic procedure for installing different blinds either inside the recess or outside the recess.
If you need a little extra help, you can check out our installation guides for everything from how to fit vertical blinds to how to fit conservatory blinds — which don’t require drilling or any power tools — and how to fit aluminium venetian blinds. You’ll find step-by-step guides for the different mounting styles as well as videos you can follow along with to get the job done right.
Gather What You’ll Need
When installing blinds, you’ll need some basic tools. Most of these tools are commonplace in households or you can head out to a hardware store to pick up anything you may be missing.
Here’s a brief list of what you’ll need to get started:
— Pencil
— Tape measure
— Screwdriver
— Screws
— Mounting brackets
— Wall plugs
— A drill with an appropriately sized drill bit (the same size as your mounting screws)
— Blinds
If you order your window treatments from Make My Blinds, you’ll get the hardware you need to install your blinds. This makes it quick and easy to get your new blinds hung so you can move on to enjoying them without the hassle of picking up extra brackets and screws.
How To Install Blinds: 6 Different Styles

While installing blinds can seem intimidating, it’s actually pretty quick and easy, even if you’re not the handiest person on the planet. Here’s a brief guide on how to install blinds including different types such as wooden blinds and vertical blinds.
1. Wooden Blinds
Also known as venetian blinds, wooden blinds feature horizontal slats that move up and down via a corded system. The blind slats are connected to one another through cords on either side of the slats which are then tied into a headrail. Many wooden blinds come with a matching valance and depending on the width of the blind, you may also need a center support bracket. Most brackets will be labeled for left, right and center (if required) to make installation easy.
Here’s how to mount wooden blinds:
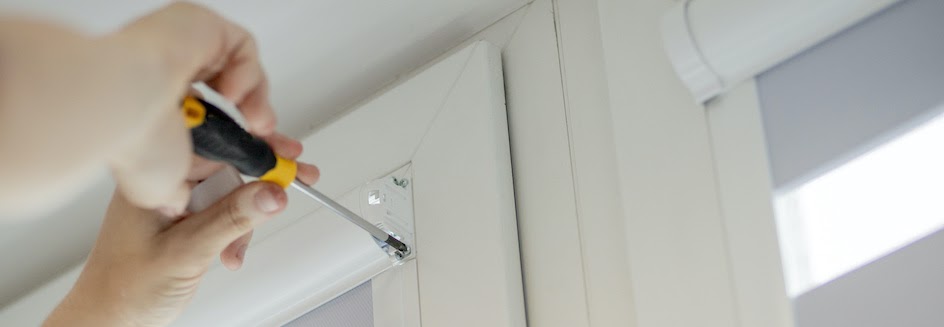
1. Start by measuring the depth of where you’ll install your brackets. To do this, measure how far your handle — and any other obstructions — protrude from the window. Use this measurement as the minimum distance for mounting. For outside mounts, measure the center point of the blind width to ensure even overlap on both sides.
2. Take the first bracket and mark the drill holes using a pencil. Repeat for the other brackets.
Drill pilot holes and insert the wall plugs.
3. Use a screwdriver and screws to install the brackets. If you’re using a center bracket, install it slightly off-center to avoid any cords.
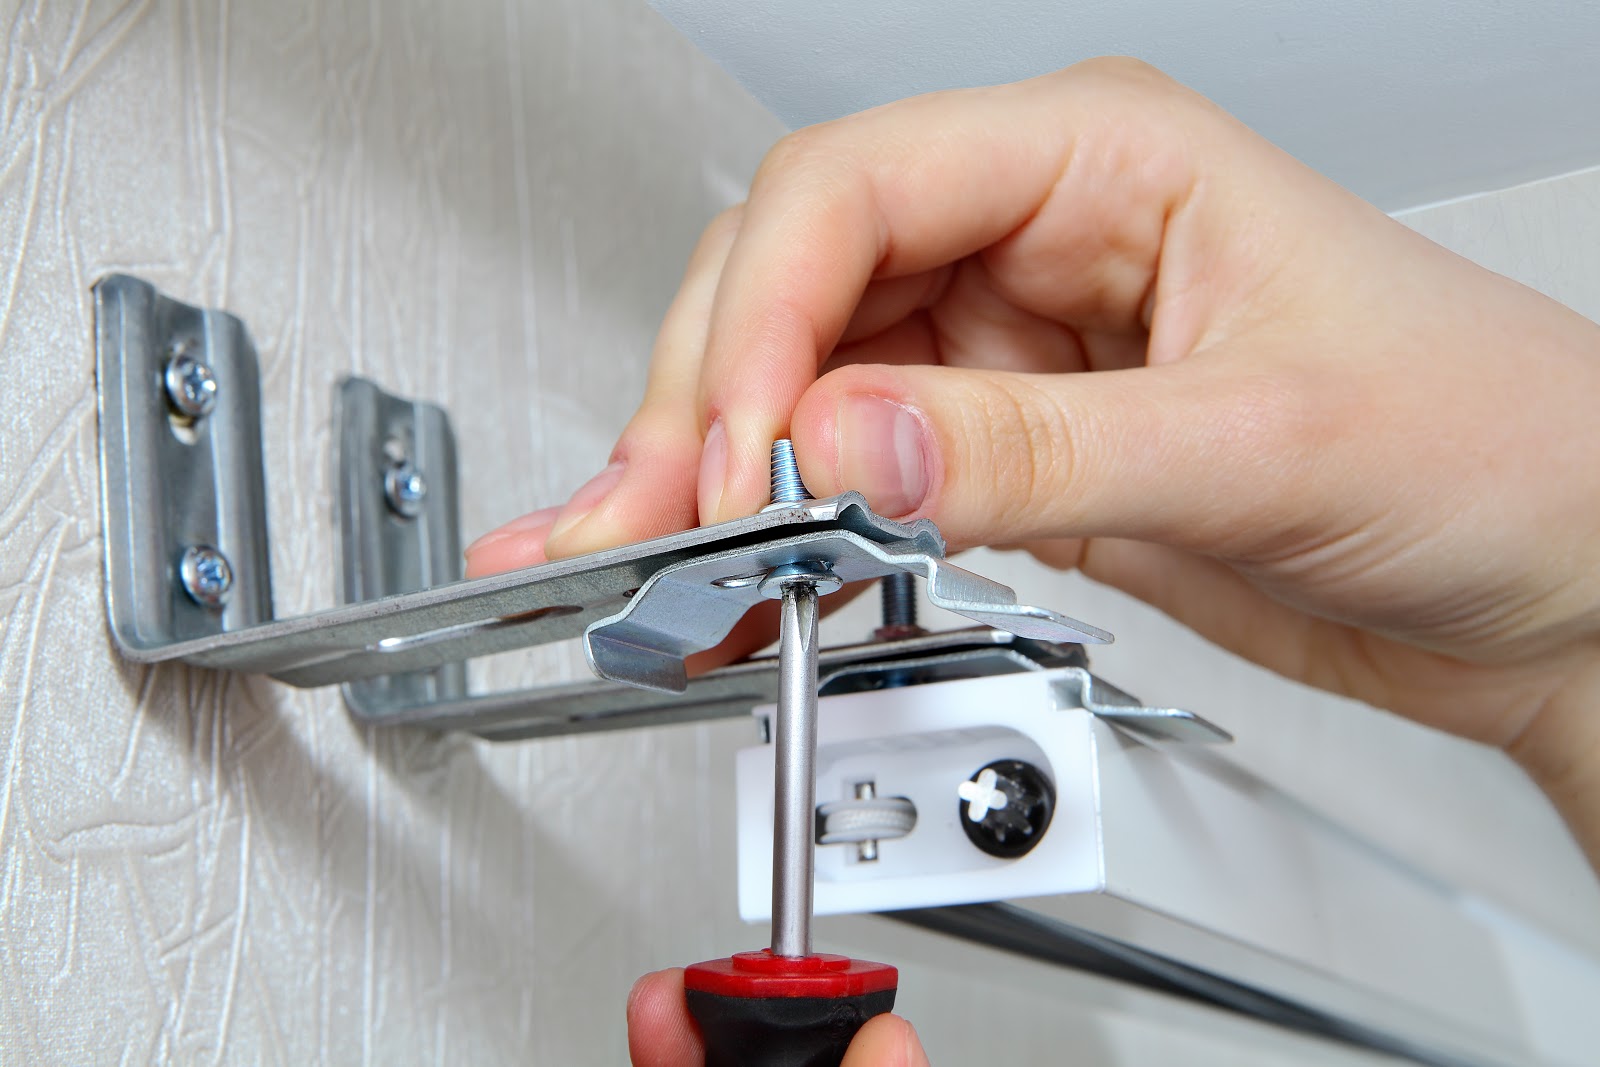
4. Open the brackets and slide the headrail into place, making sure to snap the bracket arms back into place to secure the headrail.
5. Remove the child safety cleat and install it into the window recess using the screws and a screwdriver. Tie the cords into a figure eight around the safety mechanism.
2. Vertical Blinds

Vertical blinds are different from horizontal blinds in that the slats run up and down rather than side to side. This blind style is great for bifold and patio doors and they’re also easy to clean since they collect less dust. Most vertical blinds come in two packages, one with the headrail and one with the vanes and brackets.
If you’re face fixing the vertical blinds, the first two brackets should be mounted 5 centimetres from the ends of the headrail. If you have additional support brackets, space them evenly between these two brackets. For a top fix mount, measure the window recess for any obstructions and use this as the minimum mounting distance. Again, position the brackets 5 centimetres from the end of the headrail.
Here’s how to fit vertical blinds:
1. After measuring, drill the holes and insert the wall plugs into the screw holes.
2. Use a screwdriver and screws to fix the bracket into place.
3. Clip the headrail into place.
4. Check that the hooks spin 180 degrees by pulling on the metal chain mechanism.
5. To install the vanes, the hooks need to be side-on — facing towards the left. Simply click the holes on the vanes into the hooks.
6. Install the child safety clip by tensioning the metal chain and securing it with a screwdriver.
3. Roller Blinds
Roller blinds are window treatments that feature one solid piece of fabric that rolls up onto a headrail. They are popular in high traffic areas and are available as blackout blinds and thermal blinds. They come in a huge range of colours and patterns, making them suitable for just about any design aesthetic.
Most roller blinds come with identical brackets, making it easy to install the blinds. You can use either bracket on the left or right side, minimising errors that can make mounting a time-consuming process.
Here’s how to install recess fit roller blinds:
1. Using a measuring tape, decide where to position the blind within the recess. Do this by measuring the depth of any obstacles such as handles and use this as the minimum mounting distance.
2. Mark the position using a pencil and drill the holes for the wall plugs.
3. After inserting the wall plugs, use a screwdriver and screws to secure the bracket.
4. Starting with the end with the control mechanism, snap the headrail into the bracket.
5. Finish up by installing the child safety clip and enjoy your new blinds.
4. Roman Blinds
Roman blinds are similar to roller blinds in that they’re made of various fabrics. When they are raised, the fabric folds over in delicate pleats, adding a bit of texture to the space. They’re popular in formal living rooms and entryways thanks to their regal look.
Here’s how to install roman blinds:
1. Measure and mark the holes where you’ll mount the brackets.
2. Pre-drill the holes, insert the wall plugs and secure the brackets using a screwdriver.
3. Open the swing arm on the bracket so you can mount the headrail. Remove the fabric by tugging on the Velcro strip at the top of the headrail.
4. Clip the headrail onto the brackets and push the swing arms close to lock it in place. Reattach the fabric using the Velcro strip to hide the brackets and enjoy the new blinds.
Some roman blinds like ours don’t have a child safety clip. Instead, the chain will simply break away if too much force is applied. This provides peace of mind if you have young children or pets and also saves you an extra step when it comes to installation.
5. Skylight Blinds
Skylight blinds are different from most other blind styles in that they’re designed to securely fit windows that are tilted or angled. They are relatively easy to install but keep in mind you’ll likely need a ladder to reach the windows themselves.
Here’s how to install skylight blinds:
1. Peel off the plastic covering on the sticky strip at the top of the cassette.
2. Position the cassette where you want to mount it and then press firmly, securing it in place.
3. Use a screwdriver to secure the blind in place through the built-in screw mounts.
4. Insert the side rails using a screwdriver and the provided screws.
5. To operate the blind, tilt the bottom bar and move the blind up or down as desired.
6. Perfect Fit Blinds
Perfect Fit blinds are a special type of blind that doesn't require power tools for installation. They simply snap into place, meaning you can mount them in minutes and get on to more important things. Perfect Fit Blinds are ideal for conservatories, patio doors and French doors and are usually mounted to UPVC windows. All you need to mount these blinds is a crosshead screwdriver.
Here’s how to install Perfect Fit blinds:
1. Lay a sheet or a piece of cardboard on the floor. Lay out the blind as it will sit in your window frame, including the blind top rail, the two side channels and the bottom bar. Be careful to prevent the cords from twisting.
2. Push the sections together and use a screwdriver to tighten and complete the frame.
3. Depending on the size of your blind, you may have anywhere from four to six brackets. Take a credit card and slide it into the top left of your window. Snap the first bracket into place in between the beading and the window glass and just below the credit card. Repeat for the remaining brackets on all corners and at center points if needed.
4. Take the frame and push it into the brackets at the top of the window. Work your way around the blind until all brackets and the frame are fitted together. Snap the tilting wand into place and enjoy your blinds.